
No matter what type of outdoor activities are your favorite, there’s a high likelihood that you’re going to need a hydration system. There are all sorts of hydration reservoirs and packs to suit your needs, with tons of options when it comes to shaping, size and special features.
In this article, we’ll help you understand and choose the hydration system that will work best for you. We’re going to start by explaining the differences between hydration packs, daypacks and water reservoirs. Then, we’ll talk about the four types of hydration packs and what they’re best for.
After that, we’ll go into hydration pack capacities to describe how large a pack you need to be based on what you’ll be doing and what you need to carry. We’ll then explain what you should look for when choosing a hydration pack. We’re also going to go over water reservoirs separately, covering the different capacities you’ll choose from and the other factors that go into buying the right reservoir.
Note that we’ve tried to separate information about packs from information about reservoirs in order to make it easier for you to pick and choose the hydration system that will work best for your adventures. Some people prefer an all-in-one hydration pack, while others would rather combine a daypack with a reservoir.
Table of Contents
Hydration Pack vs Daypack vs Reservoir

If you were to just look at a hydration pack and a daypack (a pack without a hydration system, for the purpose of this article) side-by-side, you may not notice any substantial difference at all. There are a lot of differences between these two types of packs, though, and choosing the right one can make it a lot easier to take your water along with you on your trip.
In this section, we’re going to clarify what we mean when we talk about hydration packs, non-hydration daypacks, and water reservoirs.
Hydration Packs
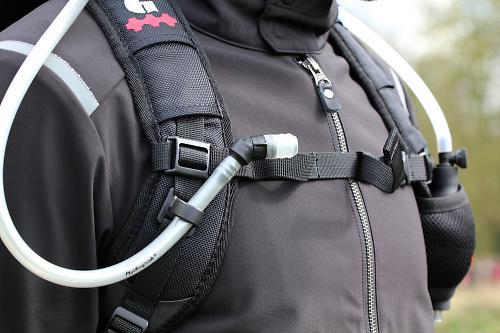
Hydration packs have everything built-in that you’ll need in order to take water along with you, as the reservoir and hose. These packs come with a lot of advantages, specifically easy and quick access to your water.
There are some drawbacks, too, though. First, reservoirs and tubes can be much more problematic than bottles during cold weather because they can freeze and block water flow. Second, you can’t easily see how much water you have left, which can cause you to not drink as much as you need to because you’re trying to conserve water or lead you to finish all of your water way too early in the day. (These are the same drawbacks as with reservoirs.)
Hydration packs are typically less costly than purchasing a daypack and a separate hydration system. With a hydration pack, the full system is already included with the pack, which keeps the price down.
Daypacks
Traditional daypacks sans hydration systems have significant construction and support, like sturdy frames and additional padding in both the shoulders and the waist. Since daypacks are more robust, they’re also heavier, which can be a problem when you then add a heavy hydration reservoir. Hydration packs, on the other hand, weigh less starting out, so you’ll be keeping weight down once you add water.
Hybrid Packs
While it’s more trouble than it’s worth to try to fit your hydration reservoir in a traditional daypack, today’s packs often have overlapping hydration and traditional daypack features. It’s common to find a regular daypack with hydration capabilities, like a sleeve for your hydration reservoir and loops to route the hose through.
Reservoirs
Reservoirs (also called “bladders) are sold separately and can be used with a daypack or swapped out for the reservoir that came with your hydration pack. The reservoir is the actual tool that holds the water, and it will have a connected hose with a bite valve that you’ll suck the water through.
Decide How You’ll Use the Hydration System
Knowing what you’ll be doing outside will determine which hydration system – or systems – you’ll need. Will you be going on daytime hikes that only last an hour or so? Will you be on foot or on a bike? What will the weather be like when you head outside?
Since there are so many hydration packs to choose from, it’ll be easier to narrow your options if you choose a pack based on the specific activity you’ll be doing, also taking into consideration what time of year you’ll be active. It’s especially important to determine if you’ll be using the pack in cold weather – if so, you’ll want one that’s equipped to deal with frigid conditions so your water doesn’t freeze in the reservoir or hose.
4 Types of Hydration Packs
There are a few different types of hydration packs to choose from, ranging from the basic to the weather- or sport-specific. Here are the four main types of hydration packs you’ll come across and how each one is best used.
General Use Packs
General use hydration packs are very similar to standard backpacks, but they have special hydration features, like the reservoir, reservoir hanger and hooks; a drinking tube with a bite valve; and loops to feed the tube through so that you can route and secure the hose. General use (also called all-purpose) packs come in all sizes and are best for short backpacking trips when you want to keep the load you’re carrying light.
Cold Weather Packs
Cold weather packs will have extra thermal protection for your hydration reservoir and the tube, and they also may come with a cover for the bite valve. However, it’s still possible that the water in your reservoir or tube will freeze, even with the additional thermal protection.
To prevent this, blow out the drinking tube every time you take a drink of water – this will keep the water from freezing and blocking water flow. I’ve also stuck the hose under my arm to thaw out water when I forgot to blow through the tube.
Cycling Packs
Cycling packs come with many of the same features as general use packs (hydration reservoir and holding compartment; drinking hose and bite valve), but there are also cycling-specific features. For example, there may be additional compartments, flaps or straps for securing your gear and tools.
You can find cycling packs to use either on paved roads or rugged trails. Packs for paved roads will be more basic than trail-ready packs (for example, they may not have a waist belt). Packs for trail cycling, on the other hand, will have additional space inside so you can take along extra layers and more tools, and you may even find packs with things like armored storage or spine protection.
Running Packs
Running packs are part-pack, part-vest. They’re made to move with your body a lot more smoothly than traditional packs. Plus, they weigh less and they usually have soft bottles as opposed to heavy, large reservoirs.
Hydration Pack Capacities
When it comes to choosing the right size hydration pack, you’ll have to consider what type of activity you’ll be doing, how long you’ll be out for, how many water sources you’ll come across (if any), and the weather you’ll experience.
Under 5 Liters
A small pack is great for short, fast hikes; cycling on paved roads, and running. Packs that are under 5 liters will have small hydration reservoirs of about 1 liter (more on liter sizes a bit later) and storage to fit just the necessities, like your tire patch kit, phone, keys, and a thin top layer if it gets chilly.
5 to 10 Liters
This size pack is good for general hiking or riding if you want to take along an extra layer of clothing, some snacks, a map, and electronics. They’re best for heading out for a couple of hours in unpredictable weather when you may need to add or remove a layer of clothing as the day goes on. These packs can hold reservoirs of 2 liters or less.
10 to 20 Liters
With this size pack, you won’t have trouble filling up a 3-liter reservoir and still having more than enough room for a few extra layers of clothing, a first aid and/or patch repair kit, food, and whatever else you’ll need in the backcountry. This is the size of pack you’ll need if you’ll be venturing far from the trailhead and spending the entire day out on the trail.
How to Choose a Hydration Pack

Comfort is going to be your top priority when choosing a hydration pack. In this section, we’ll break down the different sub-categories of comfort to pay attention to when shopping for a hydration pack.
Support
The more gear you’re going to carry, the more support you’ll need. If you’re not carrying a lot of gear, you can get away with a pack on the simple side. Look for a pack that’s meant for just a small amount of weight, which will be able to fit your water reservoir and a few small, select items. The design materials and support architecture will be more simplistic with these packs than with larger packs.
If your days are long or the weather is unpredictable, you’ll want a more substantial pack that can handle more weight. Since the weight is increased, the support will be as well, which will help make the pack more comfortable. Larger packs will have padding in the back, shoulders, and waist, and they’ll be built with a lightweight frame. The extra structure in large packs makes heavy loads more manageable.
Shoulders and Waist
The more weight you’ll be carrying on your back, the higher quality the shoulder straps and waist belt should be. When it comes to the shoulder straps, they may have additional padding or a broader structure. The broader the straps are, the more surface area they’ll cover, which can limit pressure points and distribute the weight more evenly. Waist belts are similar – the thicker and wider they are, the more comfortable you’ll be.
Ventilation
You’ll want to stay cool on your outdoor adventure, regardless of the time of year it is. Look for a pack that has breathable fabric and mesh in the areas where the pack contacts your back, shoulders, and waist.
Most of the time, a hydration pack will have a foam back pad covered with mesh and with air channels that help with breathability and ventilation. Some packs even have a tensioned back panel with a lightweight frame that keeps the pack off your back slightly to minimize contact and keep you cooler.
Water Reservoir Capacities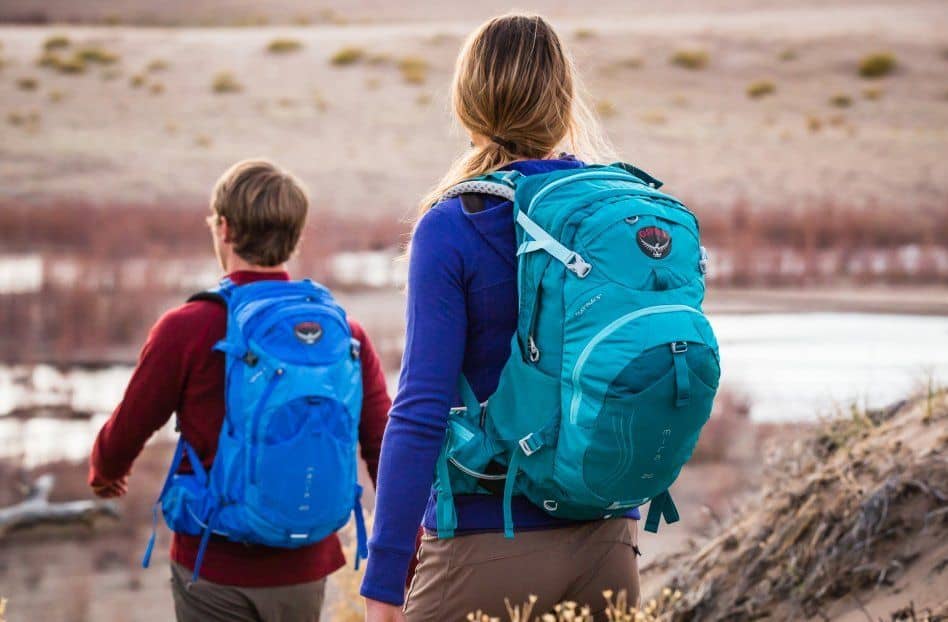
When choosing the right hydration system for you, you may want to buy a separate reservoir. In this case, keep the size of your pack in mind – smaller bags may not be able to fit larger reservoirs. Here are the three main sizes of reservoirs you’ll come across.
1 to 1.5 Liters
These small reservoirs are best for short adventures (either in duration, distance or both), such as a short day hike or a quick mountain bike ride. If you’re only going to be out for two hours or less, a 1- or 1.5-liter reservoir should be fine.
Pay attention to temperature, though – a small reservoir should be fine in cooler temperatures, but if it’s very hot or humid out, you may need more water. You can always throw an extra water bottle in your bag as a backup in case you run out.
1.5 to 2.5 Liters
If you’re going to be out and about all day long, and if there are going to be water sources where you can refill, a 1.5- to 2.5-liter reservoir is a good size. For the most part, this size reservoir should be fine for activities of up to a few hours. This way, if you head out for a short jaunt but decide to take another trail or two, you’ll have enough water to last you.
3 Liters
This is the max capacity of water you’ll be carrying, and it’s what you’ll want if you’ll be covering several miles on a hot day and don’t know if there will be water sources for refilling along the way. Even with this much water, though, be careful – I’ve been out on a few long day hikes and didn’t realize that I’d finished just about all of my water by the end, which means that just one more hour outside and I would’ve run out. Again, I think it’s always a good idea to have an extra bottle or two in your bag, which will also serve as a backup if your reservoir springs a leak.
Another tip: I have a 3-liter bag but most of my weekday hikes last about an hour. I’ll fill the reservoir up completely and use it throughout the week. It gets lighter as the week goes on and I don’t have to refill it every day. Plus, that extra weight makes the hikes more challenging.
How to Choose a Hydration Reservoir
Ease of use is going to be your top priority when choosing a hydration reservoir. In this section, we’ll break down the different sub-categories of ease of use to pay attention to when shopping for a hydration reservoir.
Refilling
How you access the water reservoir will determine how easy it will be to fill it up with water. Some are accessed via a cover over a large opening, while others have a hydration sleeve that holds the reserve in a zippered compartment – both types are easy to refill even without removing the entire reservoir from your pack.
When choosing a reservoir based on ease of filling it with water, consider the water sources you’ll use to refill. For example, it’s easy to fill a large reservoir from a deep sink, but if you’ll be refilling from a shallow sink in a hotel bathroom or from natural water sources, you’ll need a reserve with a different type of fitting, like disconnecting the tube to fill it that way.
Cleaning
How easy it is to fill your reservoir will be similar to how easy it is to clean it. Basically, the more of the reservoir you can access, the easier a time you’ll have cleaning it out and drying it. If the opening is narrow, it’s going to be difficult to clean and dry the entire reservoir.
You don’t necessarily have to clean the reservoir out after every use – I can go an entire season without giving it a thorough cleaning (though I do empty it and dry it out after every few uses). Cleaning it out will make the water taste better, though, so if you notice that the water isn’t tasting as fresh as it should, it’s probably time for a cleaning.
If you put anything sugary in the reservoir, you’ll need to clean it out completely right after your trip. When sugar is combined with a moist, warm environment, like what happens in the reservoir, bacteria can breed. That said, it’s a good rule of thumb to only ever put water in the reservoir – if you need something sugary, bring it along in a bottle.
The tube is the most difficult part of the reservoir to clean since most of them are about one-quarter inch in inner diameter. You can purchase a cleaning kit, which will include a brush intended for scrubbing the inside of the tube.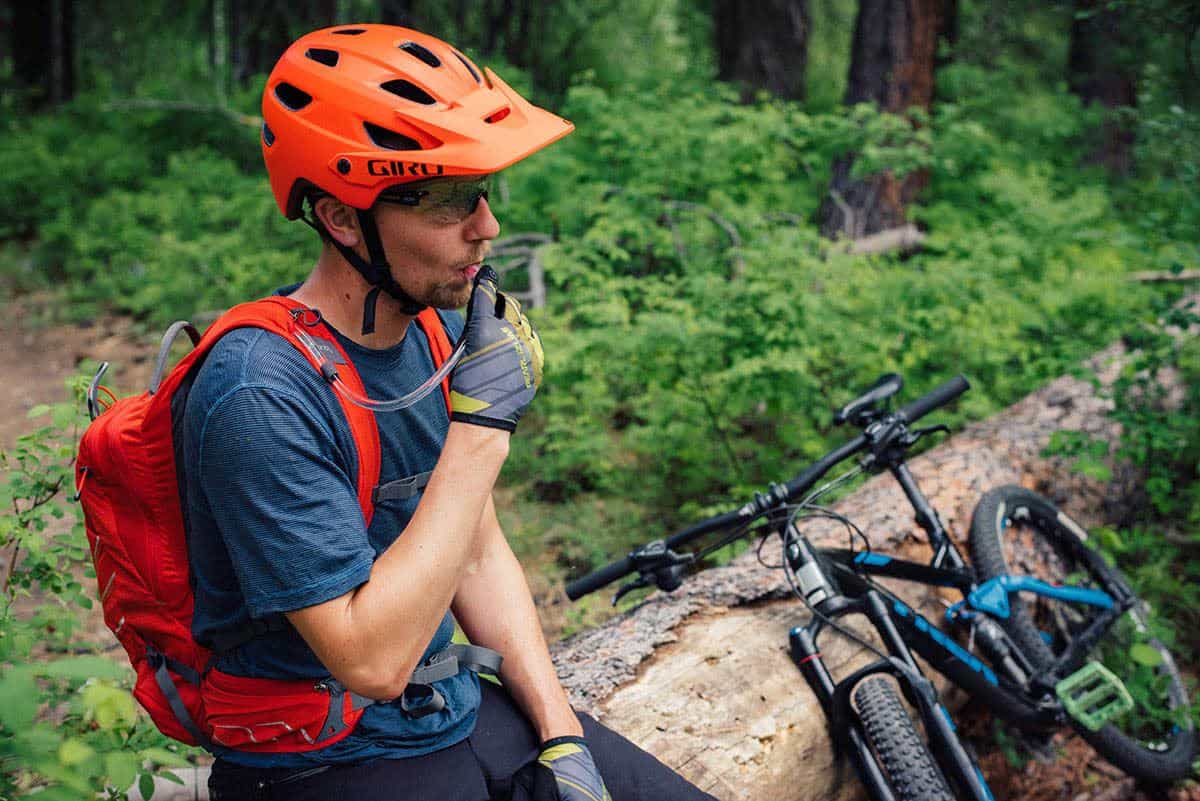
Water Flow
You want to make sure that your hydration reservoir is easy to drink from – if you can’t get the water easily when you need it, the purpose of the reservoir is defeated. Different hydration systems will have different flow rates, but odds are that a higher quality (and higher priced) pack will have reliable water flow.
You also may find that you like a reservoir from one brand but a hose from another. In this case, you’ll want to find out if there’s compatibility between systems so that you can fit together the components you prefer to create a custom reservoir. Certain brands and models have quick-disconnect fittings between the tube and reservoir.
If you’re worried about the bite valve leaking, look for one that has an on/off valve as part of the drinking tube.
Weight
The longer you’ll be out on your adventure, and the bigger-scale that adventure is, the larger a hydration reservoir you’re going to need (for both your gear and your water requirements). However, don’t bring along the max amount of water simply because you can – one liter of water equals 2.2 pounds, so filling up a 3-liter reservoir to its limit will add a whopping 6.6 pounds – a huge difference if you already have a heavy pack and even a lot of weight to carry for a short jaunt.
If you have a 3-liter reservoir, you don’t necessarily have to fill it to the brink before you head out. If you’re only going to be out for a couple of hours, you can get away with less water.
Either fill up your large reservoir just part of the way or use a smaller reservoir so that you’re cutting down weight with the water as well as the reservoir itself. If you’re heading out for a long day, find out if there are water sources where you can fill up – that way, you can carry less water on your back but still have plenty to keep you hydrated.
Combining Pack and Reservoir Requirements
You have a lot of options when it comes to your hydration system. You can choose a hydration pack with everything built-in or opt for a daypack with room for a separate hydration reservoir. You can also purchase an additional reservoir to use in place of the one that came with your hydration pack if you have different water needs based on activity. Overall, though, your goal should be to carry as much water as you need to stay hydrated without adding unnecessary weight.
Further read:
- Stay Hydrated: The Best CamelBaks for Mountain Biking That I Love
- The Ultimate Katadyn Hiker Pro Microfilter

The All-Outdoors Guide team is comprised of enthusiastic experts that enjoy helping others that aspire to be better at outdoor fun. Part of that is making sure you have the right gear and information when it’s time to go out and have fun. Some of our team have accomplished amazing feats like climbing 6000 feet to the top of mountains, others have explored every dirt trail they could find and we even have some people that have backpacked solo on various continents. No matter what our readers want to learn and do, our team is here to help them accomplish those goals.